Why I needed Windows on a Linux server
One project required a Word worker – a separate service that opens and processes .docx files through real Microsoft Word (you need the COM engine, not LibreOffice or python-docx, or the layout breaks). Word only runs properly on Windows.
I already had a machine running Linux around the clock – Docker, web services, the usual stuff. Renting another VPS just for Windows seemed excessive. I decided to run Windows in parallel on the same box as a VM.
Installing packages
Ubuntu/Debian. Install everything you'll need upfront – the hypervisor, VM tooling, OVMF (UEFI firmware for VMs), and swtpm (TPM emulator):
1234sudo apt updatesudo apt install -y qemu-kvm libvirt-daemon-system libvirt-clients \ virtinst bridge-utils ovmf swtpm swtpm-toolssudo usermod -aG libvirt,kvm $USERAfter usermod, log out and back in (or run newgrp libvirt), otherwise virsh will complain about permissions.
Preparing ISOs
You need two ISOs: Windows 11 itself and virtio-win.iso with drivers for the virtual disk and network card. Without virtio drivers, the Windows installer simply won't see the disk when choosing a partition.
Get virtio-win.iso from the official Fedora repo: fedorapeople.org/groups/virt/virtio-win. The Windows ISO – from any source you trust.
Put both files in /var/lib/libvirt/images/ and rename them to short names so commands don't become a mile long:
123456sudo mv ~/Downloads/ru-ru_windows_11_consumer_editions_*.iso \        /var/lib/libvirt/images/windows-11.isosudo mv ~/Downloads/virtio-win-*.iso /var/lib/libvirt/images/virtio-win.iso
sudo chown libvirt-qemu:kvm /var/lib/libvirt/images/*.isosudo chmod 644 /var/lib/libvirt/images/*.iso
Bridge networking and lost SSH
To make the VM visible on the LAN (instead of sitting behind libvirt NAT), you need a br0 bridge on top of the physical interface. Netplan config /etc/netplan/01-bridge.yaml:
1234567891011121314151617181920network:  version: 2  renderer: networkd
  ethernets:    eno1:      dhcp4: no
  bridges:    br0:      interfaces: [eno1]      addresses: [<HOST_IP>/24]      routes:        - to: default          via: <GATEWAY_IP>      nameservers:        addresses: [1.1.1.1, 8.8.8.8]      parameters:        stp: false        forward-delay: 0
I used a static IP instead of DHCP – more convenient for a server, no drift across reboots. eno1 is my NIC name; yours may differ (ip a will show something like enp3s0 or ens18). <HOST_IP> and <GATEWAY_IP> are the server and router IPs on your LAN (e.g. 192.168.1.50/24 and 192.168.1.1). Apply:
1sudo netplan trynetplan try I instantly lost SSH. The LLM promised that netplan try would roll back the config after 120 seconds if you don't confirm – that didn't happen on my machine. Only a physical reboot helped.Pitfall #2: TPM 2.0 and Secure Boot
First naive install attempt (i440fx + BIOS):
123456virt-install --name windows10 --ram 8192 --vcpus 4 --cpu host \ --disk path=/var/lib/libvirt/images/windows-11.qcow2,size=80,bus=virtio \ --cdrom /var/lib/libvirt/images/windows-11.iso \ --disk path=/var/lib/libvirt/images/virtio-win.iso,device=cdrom \ --os-variant win10 --network bridge=br0,model=virtio \ --graphics vnc,listen=0.0.0.0 --noautoconsoleThe installer boots, then immediately shows: "This PC must support Trusted Platform Module 2.0. This PC must support Secure Boot."
Windows 11 checks vTPM 2.0 and Secure Boot during installation. You can't get past that without them – no installer registry tweak helps. You need a proper UEFI boot with a TPM emulator.
Pitfall #3: No bootable option or device was found
Logic: switch to q35 (UEFI-capable chipset), add --boot cdrom,hd,menu=on – should work:
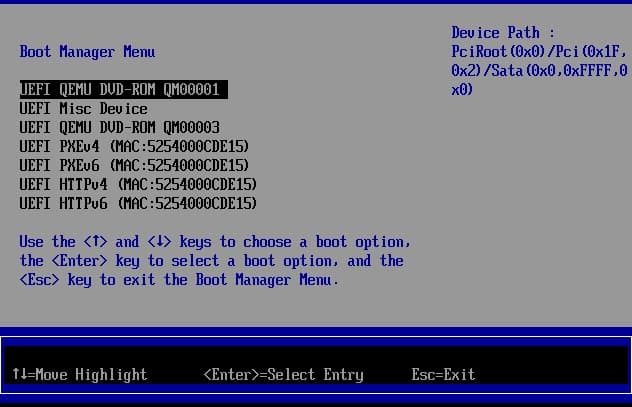
1234567virt-install --name windows10 --ram 8192 --vcpus 4 --cpu host \ --machine q35 --boot cdrom,hd,menu=on \ --disk path=/var/lib/libvirt/images/windows-11.qcow2,size=80,bus=virtio \ --cdrom /var/lib/libvirt/images/windows-11.iso \ --disk path=/var/lib/libvirt/images/virtio-win.iso,device=cdrom \ --os-variant win11 --network bridge=br0,model=virtio \ --graphics vnc,listen=0.0.0.0 --noautoconsoleAnd on VNC you get the sad No bootable option or device was found screen and Boot Manager:
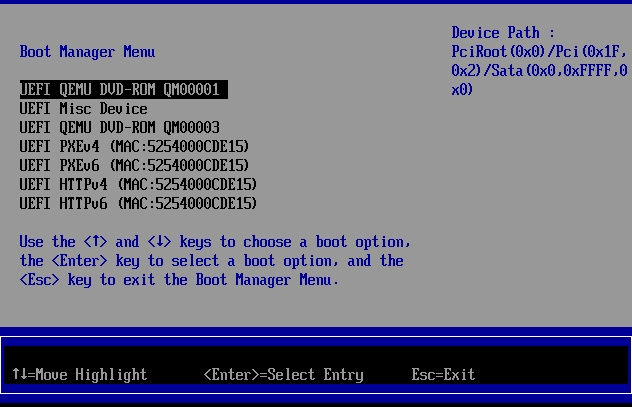
The reason: --machine q35 by itself does not enable UEFI – you must specify the OVMF loader explicitly. Without it, q35 tries legacy BIOS mode, which works poorly here, and the installer can't find a boot device. Plus --boot cdrom,hd,menu=on is outdated; for UEFI you need --boot loader=/usr/share/OVMF/OVMF_CODE_4M.secboot.fd,loader.readonly=yes.
Working command: UEFI + Secure Boot + vTPM 2.0
The final version that boots successfully and reaches the Windows installer:
1234567891011121314151617sudo virt-install \ --name windows11 \ --ram 8192 \ --vcpus 4 \ --cpu host-passthrough \ --machine q35 \ --boot loader=/usr/share/OVMF/OVMF_CODE_4M.secboot.fd,loader.readonly=yes,loader.type=pflash,loader.secure=yes,nvram.template=/usr/share/OVMF/OVMF_VARS_4M.fd,bootmenu.enable=on \ --features smm.state=on \ --tpm backend.type=emulator,backend.version=2.0,model=tpm-crb \ --disk path=/var/lib/libvirt/images/windows11.qcow2,size=80,bus=virtio,format=qcow2 \ --cdrom /var/lib/libvirt/images/windows-11.iso \ --disk path=/var/lib/libvirt/images/virtio-win.iso,device=cdrom \ --os-variant win11 \ --network bridge=br0,model=virtio \ --graphics vnc,listen=0.0.0.0 \ --video qxl \ --noautoconsoleWhat matters here:
OVMF_CODE_4M.secboot.fd+loader.secure=yes– UEFI firmware with Secure Boot enabled.smm.state=on– System Management Mode. Without it Secure Boot silently doesn't work: the Windows check seems to pass, but keys aren't actually stored.nvram.template=OVMF_VARS_4M.fd– separate NVRAM per VM (Secure Boot stores its keys there).--tpm backend.type=emulator,backend.version=2.0,model=tpm-crb– virtual TPM 2.0 via swtpm, which the installer checks for.--cpu host-passthrough– pass through all CPU flags as-is. Win 11 checks specific instructions – without passthrough you may get "unsupported processor."
If you don't have OVMF_CODE_4M.secboot.fd, run ls /usr/share/OVMF/. On older Ubuntu the names omit _4M: OVMF_CODE.secboot.fd and OVMF_VARS.fd.
Boot Manager and virtio drivers
Start the VM and connect via VNC:
12sudo virsh start windows11sudo virsh vncdisplay windows11vncdisplay shows something like :0 – that's port 5900 (:1 → 5901, etc.).
On VNC you'll see Boot Manager (that No bootable option screen). That's normal – manually select UEFI QEMU DVD-ROM QM00001 (our windows-11.iso) with the arrow keys and press Enter.
When Press any key to boot from CD or DVD... appears – press any key within 5 seconds, or you'll land back in Boot Manager.
Then it's the regular Windows installer. On the disk selection step the list will be empty – click Load driver and install from the virtio-win CD:
viostor– virtio disk driver (pick the folder for your Windows version, usuallyw11/amd64). Without it the disk isn't visible.NetKVM– virtio network driver. Without it there's no network after install.
Pitfall #4: VM shut down after the first reboot and didn't come back
Drivers loaded, disk visible, clicked Install – the installer swallowed the files and cheerfully announced that "your computer will restart automatically." Countdown runs, screen goes black, VNC shows a black square. Wait a minute, two – nothing.
virsh list --all – status shut off. The VM shut down honestly but didn't start again: libvirt doesn't restart the domain after an ACPI shutdown from the guest by default. Fixed in one line:
1sudo virsh start windows11Reconnect to VNC – installation continues where it left off. To avoid repeats (Win 11 reboots several times during install), enable auto-start on guest shutdown:
123456# autostart VM when the host bootssudo virsh autostart windows11
# so libvirt restarts the VM after an internal rebootsudo virsh edit windows11# set <on_poweroff> and <on_reboot> to 'restart'
Verifying the XML config
Make sure all required features are actually enabled:
1sudo virsh dumpxml windows11 | grep -E 'loader|smm|tpm|secure'You should see:
123456<feature enabled='yes' name='secure-boot'/><loader readonly='yes' secure='yes' type='pflash'>/usr/share/OVMF/OVMF_CODE_4M.secboot.fd</loader><smm state='on'/><tpm model='tpm-crb'> <alias name='tpm0'/></tpm>VNC over an SSH tunnel
I left --graphics vnc,listen=0.0.0.0 for the initial install convenience, but in production you must not leave it like that – unencrypted VNC exposed on the LAN.
The right way – tunnel over SSH:
1ssh -L 5900:127.0.0.1:5900 user@serverThen point your VNC client at localhost:5900. After installation you can virsh edit windows11 and change listen='0.0.0.0' to listen='127.0.0.1' – then the VNC port isn't reachable from outside at all.
Update one week later: the same KVM, but through Docker
About a week after doing all this manual setup, I found this Habr article: "Running Windows containers on Linux and MacOS". It shows almost the same idea, but through the dockurr/windows image.
Important nuance: this is not "Windows inside a regular Docker container" in the classic sense. Under the hood it is still QEMU/KVM; the Docker container just handles ISO download, installation, disk storage, web access, and RDP forwarding. Same class of problem, but without manual virt-install, OVMF, TPM setup, and loading virtio drivers in the installer.
For my case, the final docker-compose.yml looks like this:
123456789101112131415161718192021services: windows: image: dockurr/windows container_name: windows environment: VERSION: "11" RAM_SIZE: "8G" CPU_CORES: "4" devices: - /dev/kvm - /dev/net/tun cap_add: - NET_ADMIN ports: - 3389:3389/tcp - 3389:3389/udp - 9031:5000 volumes: - ./windows:/storage restart: always stop_grace_period: 2mWhat matters here:
/dev/kvm– without it you'll either get slow emulation or the container will not start at all. On a VPS this usually means you need a dedicated server or enabled nested virtualization./dev/net/tun+NET_ADMIN– required for the VM networking layer../windows:/storage– persistent Windows disk. Remove the volume/directory and you lose the installed system.3389/tcpand3389/udp– proper RDP access, much nicer than web/VNC.9031:5000– my application port for the Word worker inside Windows.RAM_SIZEandCPU_CORES– the same 8 GB and 4 cores I assigned manually viavirt-install.
If I had found this earlier, I would probably have started here. Manual KVM/QEMU is still useful when you need full control over the VM, networking, UEFI, disks, and libvirt XML. But if the goal is simply to run Windows next to Linux services and connect over RDP, Dockur gets you there much faster.
Summary
An 8 GB RAM, 4-core VM runs alongside the Linux server without bothering Docker containers and other services. The Word worker runs inside Windows and talks to the main app over HTTP on the bridge network – to Linux apps the VM looks like a regular machine on the LAN. And if you do not want to assemble the whole libvirt puzzle by hand, you can start with dockurr/windows: it is still KVM under the hood, but the entry point is much shorter.
- For Win 11: UEFI (OVMF) + Secure Boot + vTPM 2.0 are mandatory.
--machine q35alone doesn't enable UEFI – you need an explicitloader=/usr/share/OVMF/OVMF_CODE_4M.secboot.fd.smm.state=onis required alongside Secure Boot.- Without virtio drivers (
viostor,NetKVM) the installer won't see the disk. - Don't edit networking remotely without out-of-band access –
netplan trydoesn't always roll back. - After
virt-installyou may needvirsh startmanually. - A faster path is
dockurr/windowsvia Docker Compose: you need/dev/kvm, a storage volume, and RDP forwarding.